This section is ONLY accessible by THE Supervisor user.
This is where new Admissions Users are created, and their Security Rights are set up.
You can add as many Admissions users as you want at no additional cost, so there should NEVER be a time when 2 people are sharing a user login.
To add a User, or setup/change Security Rights, click Setup  and then select the Users and Security tab.
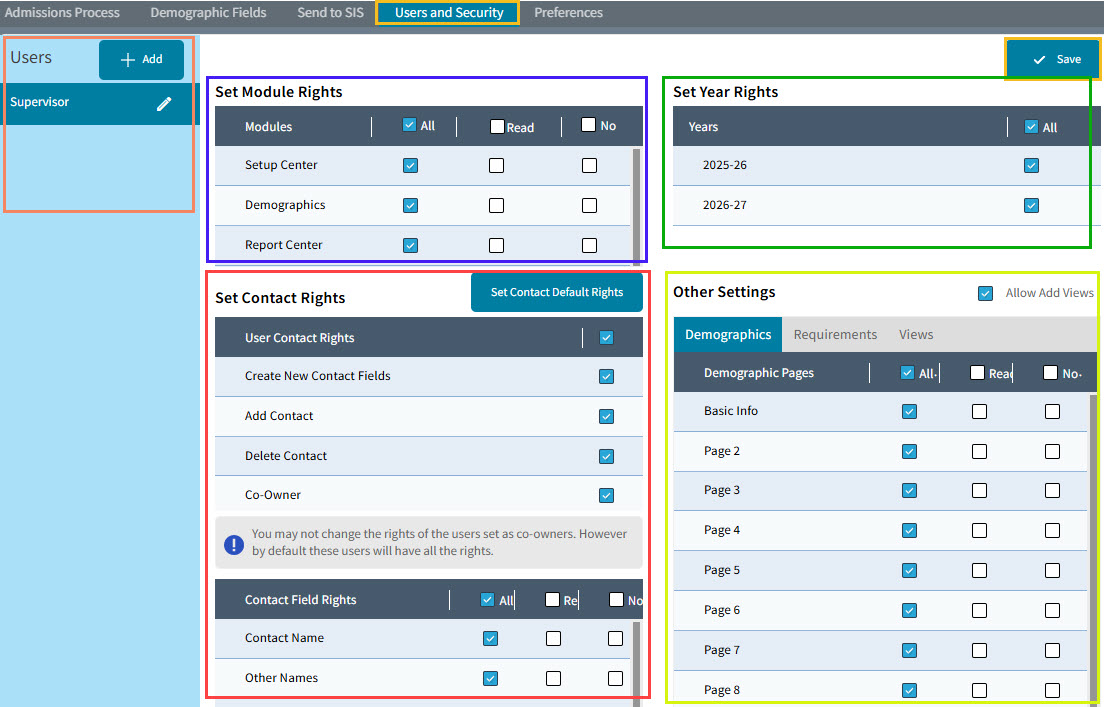
There are 5 sections on this screen which we will cover individually. Remember to always click the Save button after making any change.
Adding Users Section (far left): To add a new Admissions User, click the Add button, and the User Details window will pop open.

- Type in the User's Name: This should be the user's school email address.
If that user retires, you can either give the new person a brand new user login, or you can re-use this login by changing the user name, password and ID on this screen. - Type in the User's Password: This should be a generic starting password. The user will be able to change their password once they login.
The password must be at least 6 characters, and must include at least 1 lower case letter, 1 upper case letter, and 1 number. Special characters are acceptable, but not required.
The User can change their own password after logging in by clicking the down arrow in the top right next to their name and selecting Change Password.
- Type in the User ID: This should be the user's Name or Title
- Select the User Group: There are 4 different User Groups to choose from. Each Group has it's own parameters for user rights.
- Supervisor: The Supervisor Group will give this user Supervisor-Level rights.
This does NOT include access to this Users/Security section of the Setup Center.
The Supervisor Group gives the user:
ALL rights to all modules - this can not be changed
ALL rights to the Contact Fields - this can not be changed
ALL rights to all Demographic pages - this can not be changed - Asst. Supervisor: The Assistant Supervisor Group will give this user Assistant Supervisor-Level rights.
The Assistant Supervisor Group gives the user:
ALL rights to all modules - this can not be changed
ALL rights to the Contact Fields - this can not be changed
ALL rights to all Demographic pages - this can not be changed
The only difference between a Supervisor Group user and an Assistant Supervisor Group user is that the Assistant Supervisor can not assign household ID's using the Batch feature. - Normal: The Normal Group allows the user to have Read Only or No Rightsto the Modules and Demographic pages
- Read only: The Read Only Group allows users to have Read Only Rights - None of the rights can be set to No Rights
- Supervisor: The Supervisor Group will give this user Supervisor-Level rights.
Set Module Rights Section(center, top) : This section is where user rights are set for each module of Admissions.
The choices are All Rights, Read Only Rights, and No Rights. Check the appropriate box for each module.
Set Contact Rights Section (center middle and bottom) : This section is where user rights are set for each section of the Contact Data Base.
- Set Contact Rights: These are the 4 major rights for Contacts. The individual field rights will be discussed below.
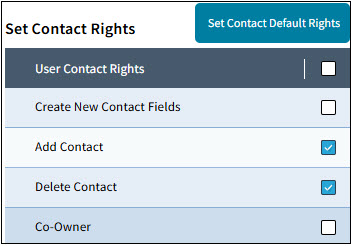
- Create New Contact Fields: This setting will allow the user to create a new field in Contacts. These would be User Defined Global or Local Fields. A new field would be where you would store additional information about the contact
- Add Contact: This setting will allow the user to add a new Contact to a prospect.
- Delete Contact: This setting will allow the user to delete a Contact from the prospect.
- Co-Owner: If a user is set to be a Co-Owner, they will have ALL rights to all of the Contact Fields.
- Set Contact Default Rights: Use the Set Contact Default Rights button to set up rights that can apply to all new users added to Admissions, or to apply to existing users.

- Contact Field Rights: Use the Contact Fields Rights to set the rights for individual contact fields.
Use the scroll bar to see the rights settings for all the fields.
If you have set the user to have Co-Owner rights in the User Contact Rights section, then you will not be able to change the individual field rights in this section, by default, all the rights will be set to ALL.

Set Year Rights Section (right top) : This section is where you set the years the user has access to.
Other Settings Section (right bottom) : This section is where you set the user rights to Prospect Demographic fields, Requirements and Views.
- Demographics: Use this section to set the user rights for each Prospect Demographic field page.
The settings are by page, and all 20 fields on that page get the same rights. If there is a specific field that you want to be able to set differently from the other fields on that page, you will need to move that field to it's own page. (Setup->Demographic Fields)
Should the user be able to edit/delete data in a field? (ALL)
Should the user be able to only read (see) the data in a field? (READ)
Should the user not be able to see the data in a field? (NO)

- Requirements: Use this section to set which Requirement a user should be able to edit (mark as complete, mark as not applicable, add a note to, change the date, etc.)

- Views: Views are created on the Multiple Prospects -> Lookup screen. This is where you can set permissions for each view; can other Admissions users have access to the view (be able to use it), can they edit (change) the view?