TABLE OF CONTENTS
Manage Courses & Sections
The School > Schedule > Manage Course & Sections tile displays the active Courses and Sections
Courses List
To view the Courses table, select the Courses number. In the Show Courses From dropdown, you can choose to display Inactive Courses Only or Both Active and Inactive Courses on the table view, however, the count on the tile will always display Active Courses Only. The list can be sorted by clicking on the column header or filtered by clicking the filter icon. Click the expand icon or Course Name to navigate to Course Details.
In the upper-right, users can export or print the Courses table, as well as add a new course.
- Send to Excel to export the filtered list with all columns.
- Print includes the filtered list with only the first 6 columns (Course #, Alias, Course Name, Description, Level, Department) and Opt. Section Size.
- Add New Course requires all rights to Scheduling.

Sections List and Roster Drop
Click the number of Sections to see the Sections from Active Courses Only. There is a dropdown to choose to display Inactive Courses Only or Both Active and Inactive Courses on the table view.
The list can be sorted by clicking on the column header or filtered by clicking the filter icon.
Send to Excel to export the filtered list with all column.
Print includes the filtered list with only the first 10 columns (Course #, SC, Course Name, ID, Teacher, Meeting Time, Term, Room, Start Grade, End Grade) and Size.

Click the ellipsis icon to Edit the section or drop the entire roster (Unschedule, Withdraw Leave, Withdraw Delete)
- Unschedule will remove the students from the section but leave the course request.
- Withdraw Leave will Withdraw the students from the section but leave the course section in their records.
- Withdraw Delete will remove the students from the section, and the section will no longer appear on their records.
If any of the students have grades, then a warning will come up that the roster delete cannot be processed.
Click the view icon to open the View Section screen which includes Extended Section Information
Click the roster icon to open the View Roster screen
Add New Course
Add New Course: Settings
Click the  gear icon on the Manage Courses & Sections tile to select the default values when adding a new course.
Select a Course Number
To Add a New Course select from either the Course List
or from the expanded view of Manage Courses & Sections.
The Add New Course window opens. Only UNUSED Courses will be shown.
If you would like to view existing courses in the list, select Show Existing Courses.
For example, If you are adding a new English course, but you want to be sure the new course is in the same range as your existing English courses, you could choose to Show Existing Courses, then View first course from the department: 0 (English).
There is also an option to Move to CRS# - enter the number to move to that course number regardless of Department.

Highlight the unused course of your choice and click Select.
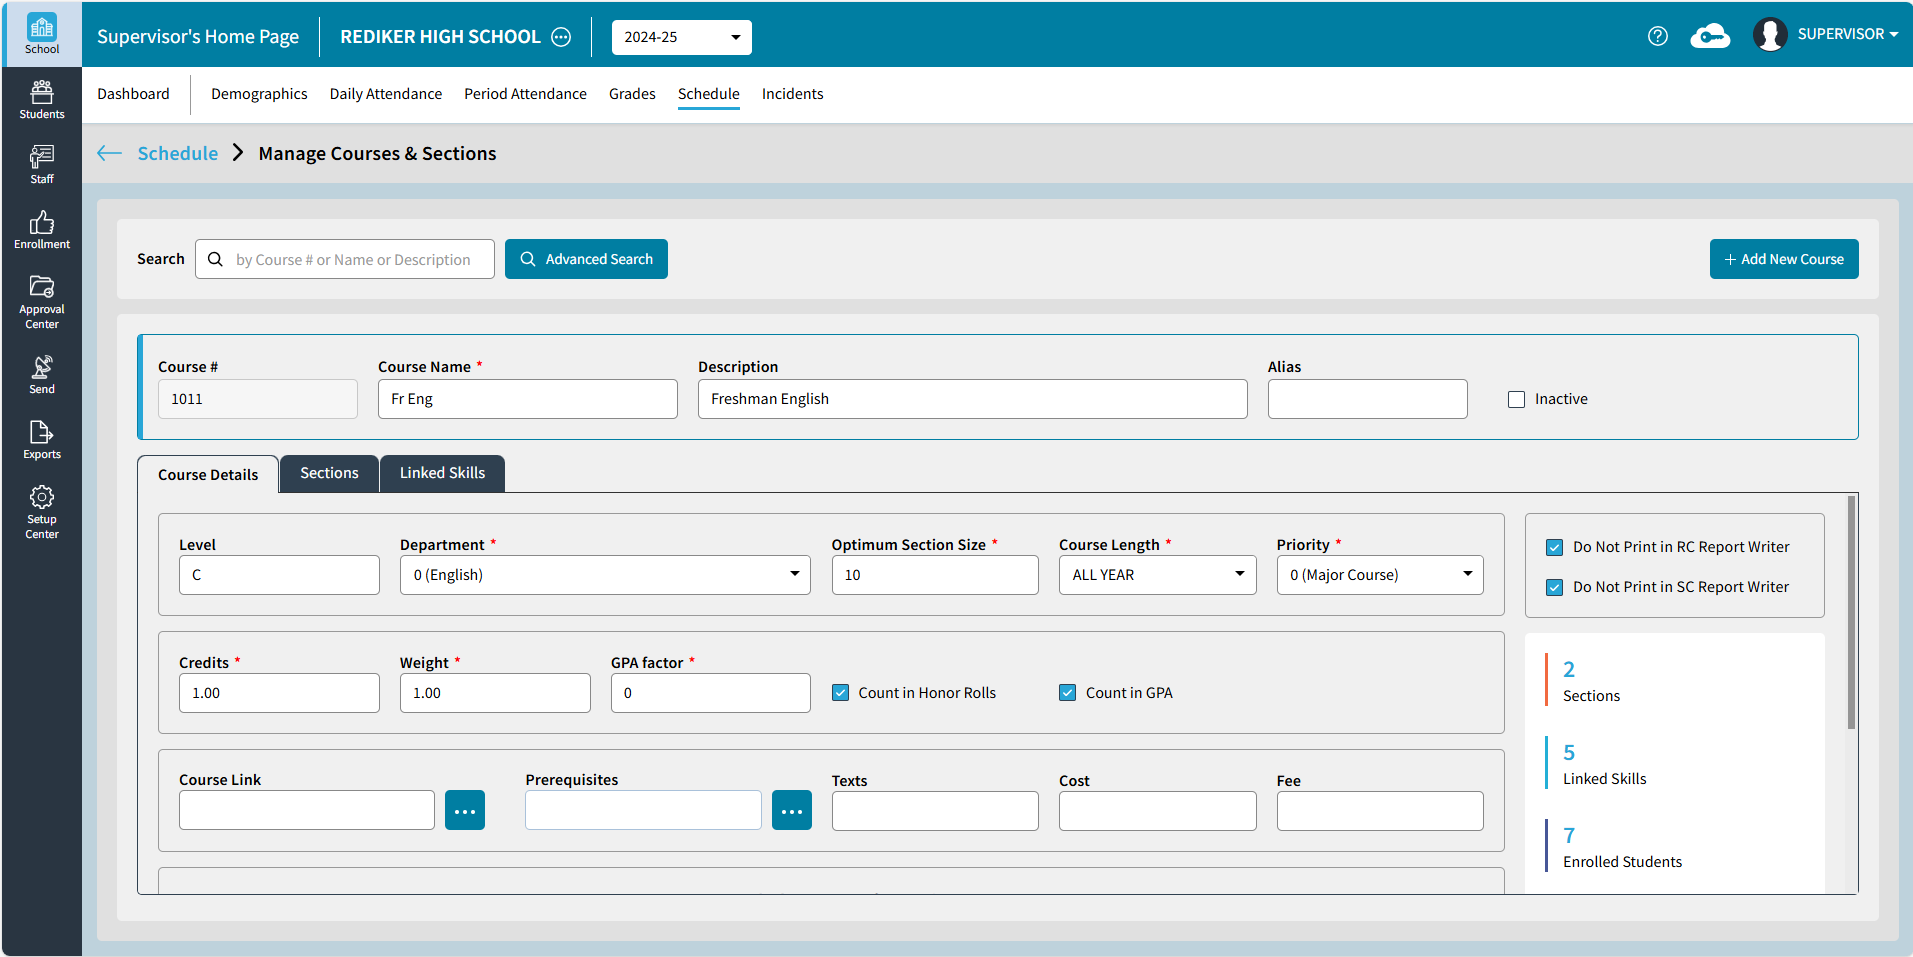
Enter Course Details
The following information is mandatory and must be entered when adding a new course. If these are not entered, the course cannot be saved:
- Course Name
- Department
- Optimum Section Size
- Course Length
- Priority
- Credits
- Weight
- GPA Factor

Search for a Course
After expanding the tile, the Manage Course & Sections page opens.
Search to find a course using Course Number, Course Name, or Course Description.
Advanced Search includes additional search options, Course Alias, Level, Department, or Length.
Edit Course
Select a course to see Course Details and Analytics (# Sections, # Linked Skills, # Enrolled Students, # Course Requests), as shown below.
Extended Course Information can be viewed by scrolling down to the bottom.
To edit an existing course, click in any field, the follow warning will appear:
Please be aware edits to the following information for a course will affect all students who currently have this course in their transcripts: Course Name, Description, Alias, Level, Department, Course Length, Credits Weight, and GPA Factor.
Courses should not be inactivated if they need to be printed on a Student Transcript.
Courses cannot be deleted from either AdminPlus.com or Classic Administrator's Plus if Scheduling Edit is enabled for AdminPlus.com.
Delete Course
The AdminPlus Supervisor can delete a course that was added in error. To delete a course, select a course and click . Courses that have sections cannot be deleted.

Sections
You can add sections to a course to offer the course at different meeting times and with different teachers. From the Manage Courses & Sections screen, select the Sections tab to view Section detail.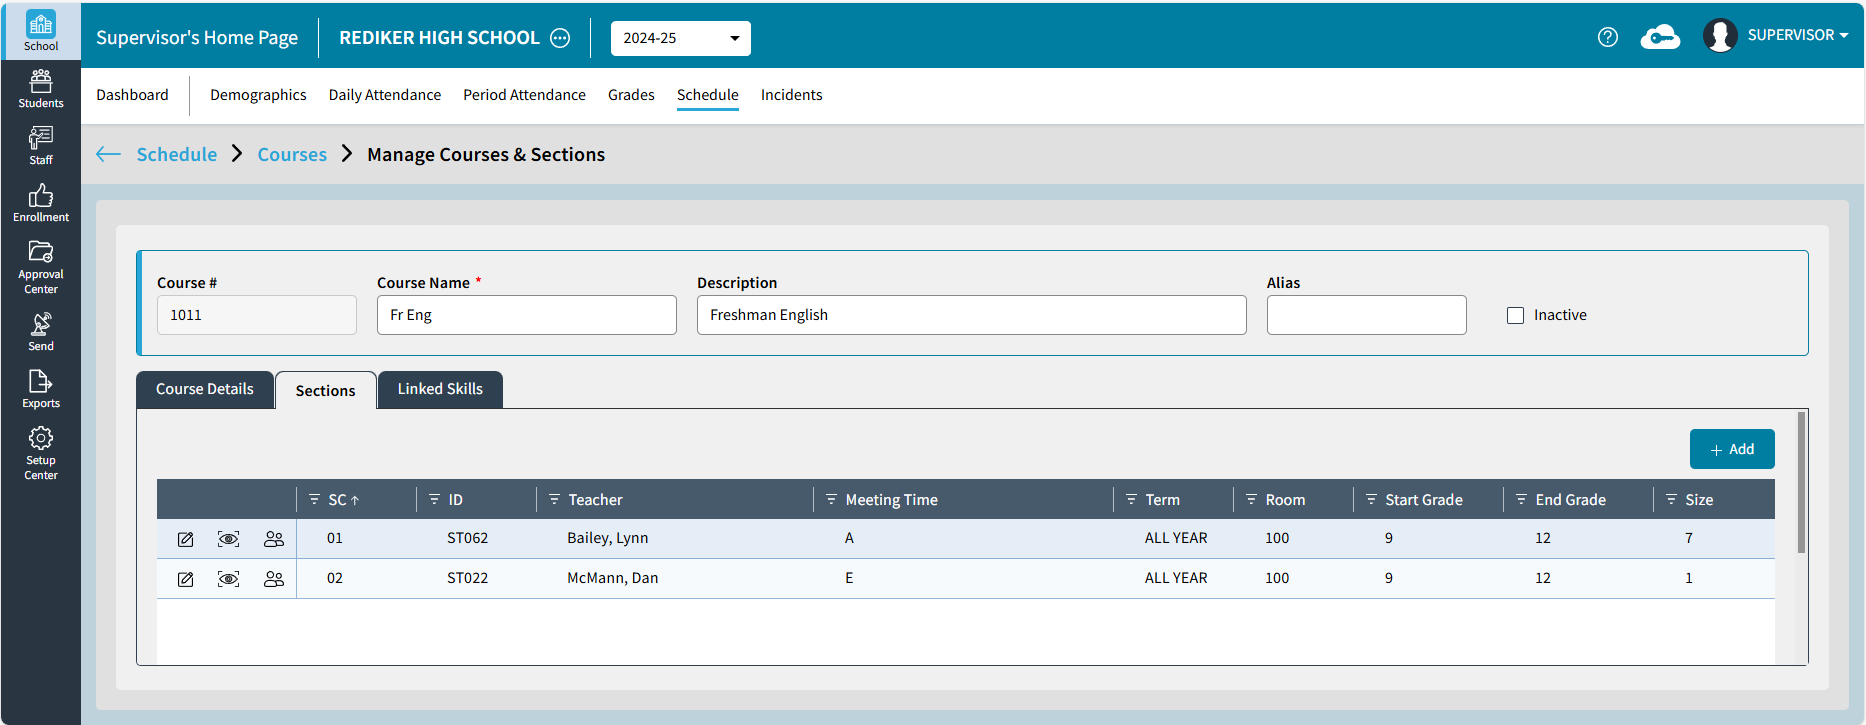
Add a Section
From the Sections tab, select . The Add Section window opens.
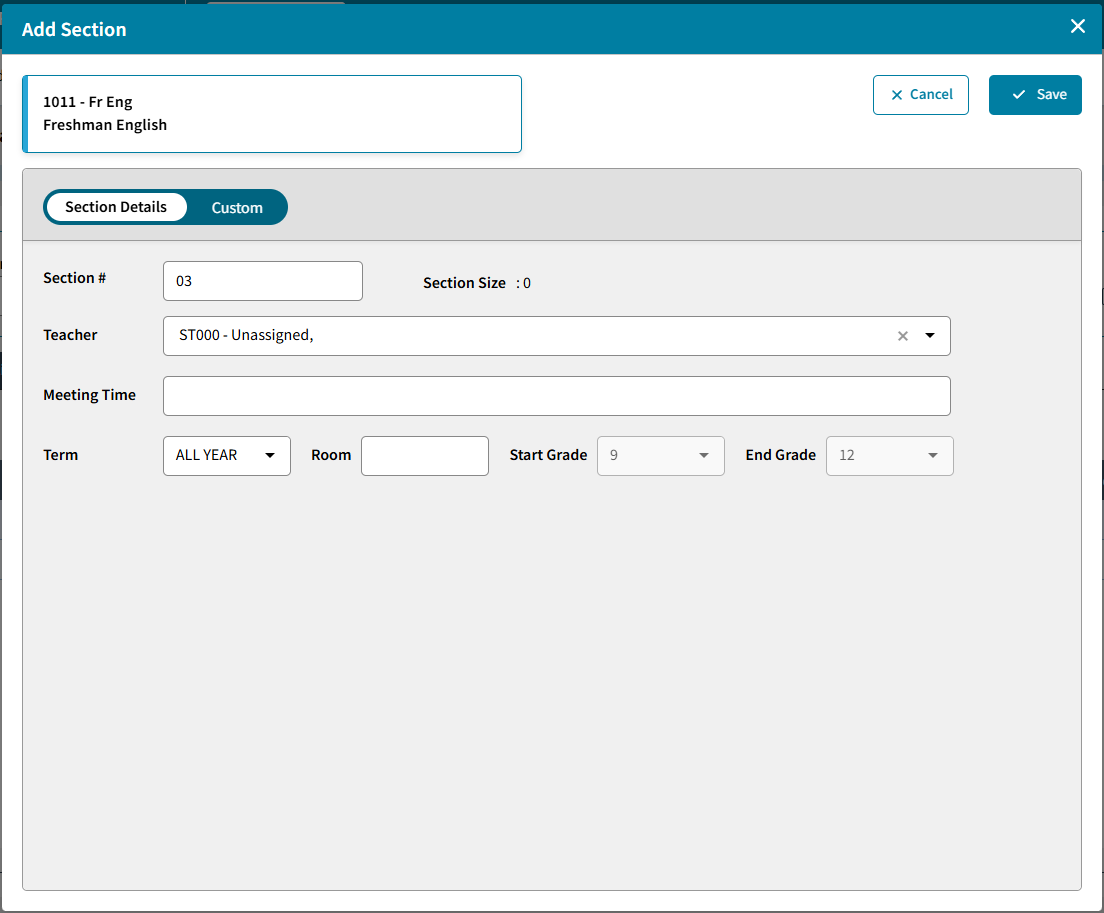
- Section Number: On default, the next section number is entered. Or you can choose to enter in another section number. This can be a two-digit number.
- Teacher: Manually type the Teacher Name or select the dropdown to select a teacher
- Meeting Time: Enter an alphanumeric Meeting Time
- Term: Select the term. The options are predetermined by the Course Length setting for the Course.
- Room: Enter in which room the section will meet
- Start Grade / End Grade: Select which grades should take be able to take this course section.
- Custom: is used to add optional Extended Section information, such as StaffSectionAssignment or SectionInfo.
To add an additional line, select
- Click Save to save the newly added section.
Edit a Section
To edit an existing section, select ![]() . The Edit Section window will open. On the Section Details tab, the following can be updated:
. The Edit Section window will open. On the Section Details tab, the following can be updated:

- Section Number: This is display only and cannot be edited. This can only be edited when the section is initially added.
- Teacher: Manually type the Teacher Name or select the dropdown to select a teacher
- Meeting Time: Enter an alphanumeric Meeting Time
- Section Length: Select section length. The options are predetermined by the Course Length setting for the course.
- Room: Enter in which room the section will meet
- Start Grade / End Grade: Select which grades should take be able to take this course section.
- Custom: is used to add/edit optional Extended Section information, such as StaffSectionAssignment or SectionInfo.
To add an additional line, select - Click Save to save the newly added section.
To Assign Teachers, Rooms, or Meeting Times to multiple sections at once see Batch Edit Sections
View Roster
Click the ![]() to View Roster and course section details. The Roster report can be printed or emailed to selected Staff or Admin Users.
to View Roster and course section details. The Roster report can be printed or emailed to selected Staff or Admin Users.

Extended Section
Click the ![]()
to view the Extended Section Information. Click  to print the course section information.

Linked Skills
The Linked Skills tab displays the Skill Code, Group Heading, and Skills linked to the course in classic.

Copy Skills To
Copy Skills To is used to select additional courses that should be linked to the same skills.

Next, confirm that the skills should be copied and any existing skills in the target course will be replaced.
A Confirmation message will pop-up if successful.
However, if skill grades exist for the course, then another confirmation will require DELETE to be entered and Save Changes to proceed.
Manage Linked Skills
Manage Linked Skills is used to link skills to the course by selecting from the Available Skills list.
Use the Search feature to find the skill in Available Skills, then click the right arrow to add to the Selected Skills. 
In Selected Skills, use drag and drop to re-arrange the list as it should appear on the report card and click Save.
