You can customize your report cards by editing the layout, adding or removing report card columns, and rearranging data within the columns. You can also add grade symbols and generate class rank and honor roll for individual grades. This chapter covers these tasks and more.
TABLE OF CONTENTS
- Add a Grade Symbol
- Generate Class Rank
- Generate the Honor Roll
- Manage Report Card Columns
- Copy First Semester Grades into the Final Grade Column
- Transfer Report Cards Data
Add a Grade Symbol
Personalize your grading process by adding grade symbols in AdminPlus. You can assign quality points to a symbol and determine if a student will receive credit when they're assigned the symbol. You can also choose to count the symbol toward the student's GPA and honor roll calculations.
Note: Quality points are a numerical representation of a grade symbol, and they vary from school to school. Whether or not you choose to give credit for the grade symbol, the quality points are added to the student's grade total. If you choose to give credit for the grade symbol, the credit is added to the student's credit total. The following figure is an example of a grade scale with quality points.
To add a grade symbol, do the following:
- In Report Cards, click Cust RC.
- Click 1. Edit grade table, and click Next.
- Click an unused row with no red brackets, and click Edit [F3].

- Enter the new grade symbol in the SYMBOL column.
- Click the Q Points cell, and enter the desired number of quality points.
- Click N in the Credit column, and click Y or N from the drop-down list, depending on whether or not the student is to receive credit when the symbol is assigned.
Note: Y represents yes, and N represents no.
- Click N in the Average column, and click Y or N from the drop-down list, depending on whether or not the grade is to be counted in students' GPA and honor roll calculations.

- Click Accept [F10].
Generate Class Rank
Generate the class rank for individual grades using the Stat Reps feature. Use simple or adjusted GPAs and quality points to create the class rank, and optionally include the class rank on students' report cards. The following figure is an example of a class rank report.

- In Report Cards, click Stat Reps.
- Click 2. Grade point averages, and click Next.
- Click 1. Print class rank report, and click Next.
- In the Print Class Rank Report dialog box, do either of the following for the 2. Also Print to Disk (Must Do For Transcripts) specification:
- Click Yes to include the class rank on report cards.
- Click No to exclude the class rank on report cards.
- Click USE CAREER DATA from the 3. Use Career Or Last Update Data drop-down list.
- Click USE SIMPLE GPA DATA from the 4. Use Simple Or Adjusted GPA's/Qual Pts drop-down list.
Tip: Click USE ADJUSTED GPA DATA to include extra points awarded from honors classes when calculating the class rank.
- Click GPA'S, CREDITS, or QUALITY POINTS from the Search By GPA, Credits Or Quality Points drop-down list to determine what value the class rank is calculated with.

- Click Done.
- Click a grade to use for the class rank calculation from the Grade number drop-down list, and click Next.
- Click Print [F9].
Generate the Honor Roll
Generate a customized honor roll for individual grade levels, so students can be recognized for their hard work and achievements during each marking period.
- In Report Cards, click Stat Reps.
- Click 1. Honor rolls, and click Next.
- Click 1. Print honor roll #1, and click Next.
Note: If you're repeating this task for each grade level, this specification should increase each time. For example, if this is your second time repeating this task, you should click 2. Print honor roll #2, and so on.

- Enter a name for this honor roll in the Title Of This Honor Roll box.
- Click
 next to the Marking Period box, click the desired marking period for which you want to calculate the honor roll, and click Select.
 - Click YES (also erases (clears) prev HR status) from the Include Students Already On Any Honor Rolls drop-down list.
Click NO if you're repeating this task for honor rolls #2–5.
- Enter the lowest average a student must achieve in order to receive honor roll status in the Average Lower Limit (0 For No Limit) box.
- Optional: In the Omit if 1 Major Grade Less Than box, enter the lowest major class grade below which a student is to be omitted from honor roll status. Repeat for the Omit if 2 Major Grades Less Than box, if applicable.
- Optional: In the Omit if 1 Minor Grade Less Than box, enter the lowest minor class grade below which a student is to be omitted from honor roll status. Repeat for the Omit if 2 Minor Grades Less Than box, if applicable.
- Choose whether or not to exclude a student from honor roll status if they receive any incompletes in the Omit From Honor Roll If 1 Or More Incompletes specification.
- Enter the appropriate number of grades to use for the calculation in the Minimum # Of Grades Used For The Average box, and click Done.
- Click an individual grade level from the Grade number drop-down list, and click Next.
Warning: You must generate the honor roll for one grade level at a time so that the honor roll can be saved successfully.
- Repeat steps 2–12 for each subsequent grade level's honor roll.
Manage Report Card Columns
The Administrator's Plus Report Cards module gives you the flexibility to adjust the layout of your report cards. You can add or remove report card columns through the Cust RC feature.
Note: To add or remove a report card column, you must be logged in as supervisor. If you own TeacherPlus Gradebook, you must also receive a key from Tech Support every time you add or remove a report card column.
Add a Report Card Column
- In Report Cards, click Cust RC.
- Click 3. Customize report card columns, and click Next.
- Click a 0 UNUSED N row, delete the 0, and enter the report card column name in the 25 Character Name column.
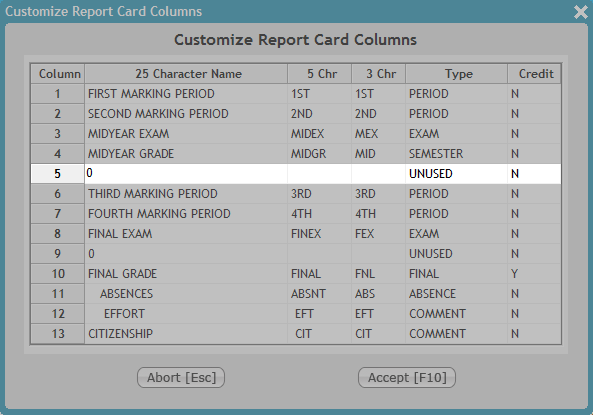
- Enter an abbreviation of the column name of up to 5 characters in the 5 Chr column.
- Enter an abbreviation of the column name of up to 3 characters in the 3 Chr column.
- Click UNUSED, and click the type of column from the drop-down list.

- Click N in the Creditcolumn, and then do either of the following:
- Click Y from the drop-down list to award credit for the column.
- Click N from the drop-down list to exclude this column from the student's credit total.
- Click Accept [F10].
Remove a Report Card Column
- In Report Cards, click Calc Avg.
- Click 2. Blank report card column(s), and click Next.
- Click
 next to the First Column To Blank (Erase) box, click the column you want to clear, and click Select.

- Click
 next to the Second Column To Blank (Erase) box, click the column you want to clear, and click Select.
Tip: Click ***NOT SELECTED*** to only clear one report card column.

- Click Done.
- Click All sections, and click Next.
- Click Yes to confirm the warning.
Copy First Semester Grades into the Final Grade Column
During the school year, you can rearrange data in your report card columns. For example, you can copy your first semester grades into the final grade column of your first semester. This task is useful to award a student a final semester grade based solely on their performance in that semester.
- In Report Cards, click Calc Avg.
- Click 1. Calculate averages, and click Next.
- Click
 next to the Calculate Which Column box, click FINAL GRADE, and click Select.
 - Click
 next to Include Which Sections, click Semester 1 Sections Only (Not All Yr), and click Select.
The following figure illustrates steps 2–4.

- Click Done.
- Enter 100.00 in the First Marking Period box, enter 000.00 in all other boxes, and click Done.

- Click 1. All sections, and click Next.
Transfer Report Cards Data
To complete a report cards transfer, do the following:
- Update GPAs and credits in your current school year by using Stat Reps in Report Cards.
- Make sure all Administrator's Plus users are logged out of the system.
- Log in to Administrator's Plus as the Supervisor.
- In Report Cards, click Transfer.
- Once you're certain that no other users are logged in to Administrator's Plus, click Yes to confirm the Network Warning message.
- In the Specifications dialog box, configure the following settings:
- Source Folder?: Select the current school year.
- Source Grades?: Select the check box next to the grade levels you want to receive data from. For example, in a 9–12 grade school, select grades 9, 10, and 11.
- Destination Folder?: Select the new school year.
- Transfer Data Base Info?: Do one of the following:
- Click Yes to and set the Selected Fields to complete a database transfer to the new year.
- Click No to skip the database transfer process.
Note: Consult your school administrators about the database transfer before overwriting data in the new year.
- Archive Data During Transfer: Click Yes to archive transcript information.

- Click Done to begin the transfer process.
A Reminder message appears. If you haven't already, you must update GPAs in your current year before continuing with the report cards transfer.

- If you've already updated GPAs in the current year, click Yes to continue with the transfer.
- Click 1. Begin Transfer, and click Next.
After the transfer completes, a report appears showing a list of data that did not transfer successfully. If a student’s information didn't transfer that needs to be transferred, click 2. Individual student override.