Using the Lesson Planner, you can build lesson plans for your classes, share your lesson plans with students and parents, and use your lesson plans for your other classes in the current year or for the same class next year.
The following topics describe how to create and manage lesson plans and lesson plan quizzes:
TABLE OF CONTENTS
- The Lesson Planner
- Add a Unit to the Lesson Plan
- Add a Lesson to a Unit
- Add Content to a Lesson
- Add a Quiz to a Lesson
- Copy a Quiz from Another Lesson
- Edit a Quiz in a Lesson
- Preview a Quiz in the Lesson Planner
- Delete a Quiz from a Lesson
The Lesson Planner
Lesson plans are organized into units that contain lessons. The lessons contain content such as an overview (or objective), homework, assignments, online quizzes, or other learning resources related to the lesson. You create the units, add lessons to the units, and then add content to the lessons.
Example
You want to create a lesson plan for a math class that includes a unit on fractions. You could start by creating a unit called "Working with Fractions". Next, you might add two lessons, "Adding Fractions" and “Subtracting Fractions”, to the unit. To each of these lessons, you could then add the appropriate content.
Important: You only see the Lesson Planner tab if your PlusPortals administrator has enabled it.
Lesson Planner Panels
The Lesson Planner is divided into panels. The Units and Lesson Plans panel provides a table of contents for navigating your units and lessons. Each unit also has a panel. From the Unit panel, you can add lessons to units as well as edit, copy, delete, or print units and lessons.
The diagram and table below provide an overview of the Lesson Planner panels.
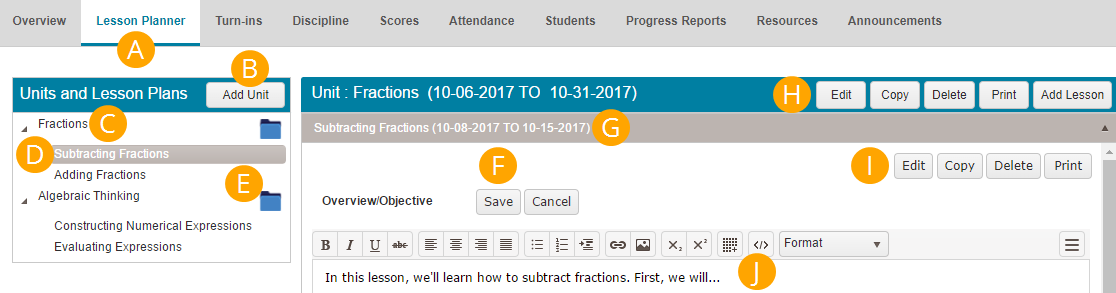
Overview of the Lesson Planner Panels | |
| A | Display the Lesson Planner tab. |
| B | Add a new unit to the lesson plan. |
| C | Click the arrow next to a unit to display the lessons assigned to it. |
| D | Add content to a lesson. |
| E | Add teacher resources. |
| F | Create or edit a lesson overview or objective. When clicked, Edit is replaced with Save. |
| G | Add content to a lesson. |
| H | Edit a unit, copy a unit to another lesson planner, delete a unit and its lessons, print a unit, or add a lesson to a unit. |
| I | When a lesson is expanded, you can edit the lesson, copy it to a different section, delete it, or print it. |
| J | Format the text of the overview or objective, and add hyperlinks, images, tables, and YouTube videos. |
Add a Unit to the Lesson Plan
Adding a unit to the lesson plan is the first step in building a lesson plan. To add a unit to the lesson plan, follow these steps:
- On the Home tab, click the class you are building the lesson plan for.

- On the Section Menu, click the Lesson Planner tab.
Important: You only see the Lesson Planner tab if your PlusPortals administrator has enabled it.
- On the Units and Lesson Plans panel, click Add Unit.

The Add Unit dialog box opens. - See the table below to create a new unit or add an existing unit.
To | Do This |
Create a new unit |
|
Add a unit from a previous year |
|
Add a unit from another class this year |
|
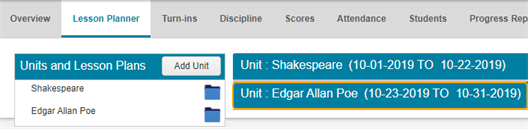
The new Unit panel appears to the right of the Units and Lesson Plans panel.
Add a Lesson to a Unit
Lessons are part of a unit. Lessons focus on specific learning objectives for a lesson plan. Once you've added a unit to a lesson plan, you can add lessons to the unit.
Add a Lesson
To add a lesson to a unit, follow these steps:
- On the Home tab, click the class that contains the lesson plan you are adding the lesson to.

- On the Section Menu, click the Lesson Planner tab.
Important: You will only see the Lesson Planner tab if your PlusPortals administrator has enabled it.
- On the Unit panel you want to add the lesson to, click Add Lesson.

The Add Lesson dialog box opens.
- See the table below to create a new lesson or add an existing lesson.
To | Do This |
Create a new lesson |
Note: You can change the visibility settings at any time.
|
Add a lesson from a previous year |
|
Add a lesson from another class this year |
|
Add Content to a Lesson
After you add a lesson to a unit, you can add content to the lesson.
Add Content
To add content to a lesson, follow these steps:
- On the Home tab, click the class that contains the lesson plan you are adding the content to.

- On the Section Menu, click the Lesson Plannertab.
You will only see the Lesson Planner tab if your PlusPortals administrator has enabled it.
- On the Unit panel, click the lesson title to expand it.
- See the table below to add specific types of content.
To | Do This |
Add a lesson overview and/or objectives | Next to Overview/Objective, click Edit, type the necessary information, and click Save. |
Add an assignment | Scroll down to Activities, click Add New > Assignment. In the New Assignment dialog box, type the necessary information (including visibility settings), click Save, and then click OK. |
Add a quiz | |
Add a file or link | Scroll down to Digital Resources, click Add New > Document or Link. Type the necessary information, and then click Save. The file size limit for attachments is 50 MB. |
Add skills | Scroll down to Skills and Standards, click Add New, click the skill, and then click Select. Repeat this step to add more skills. To add several consecutive skills at once, click the first and last skill while pressing Shift. Skills and standards only appear for schools that use them. You can only select from the list of available skills. |
Add a Quiz to a Lesson
Using the Quiz Builder, you can create a quiz and add it to a lesson. In their portal, students can view the quiz from the Coursework panel on the Overview tab or the Lesson Plans tab.
Quizzes can contain multiple sections and any combination of essay, true-or-false, multiple-choice, file-upload, and short-answer questions. Quizzes comprised of all true-or-false and/or multiple-choice questions are graded automatically.
You determine how long students have to complete a quiz and whether students can retake a quiz. You also control when parents and students see quizzes on their portals and if they can see quiz scores or details of graded quizzes.
You can add quizzes to your Gradebook and copy them to other lessons. (See Copy a Quiz from Another Lesson.)
Important: You must manually transfer quiz grades to your Gradebook.
Define Quiz Settings
To begin building your quiz, follow these steps:
- On the Hometab, click the class that contains the lesson you are adding the quiz to.
- On the Section Menu, click the Lesson Planner tab.
Important: You will only see the Lesson Planner tab if your PlusPortals administrator has enabled it.
- On the Unit panel, click the lesson title to expand it.
- Scroll down to Activities, and click Add New > Quiz.
- Click Create new Quiz, and then click Next.Note: To use an existing quiz, click Copy Quiz from another lesson and select the quiz.
- The Quiz Builder opens.
- See the diagram and table below for other optional settings.


Add Quiz Panel | |
A | Type a description for the quiz. |
B | Type the length of time in minutes that students have to complete the quiz. A counter in the student portal displays the time students have left. If you do not specify a duration, the quiz has no time limit. Note: Students can save their answers and finish the quiz later. If you've set a Duration, the time they have left is saved. For example, if you set the Duration for 10 minutes and a student spends 5 minutes taking the quiz before saving it, the student has 5 minutes left to finish the quiz. |
C | Type the last day students can take the quiz, or click |
D | To make the quiz available in the parent and student portals, select the Visible to Parents and Students check box. Next to Publish Start Date, type the date and time the quiz becomes visible and available for students to take. Next to Publish End Date, type the date and time the quiz availability ends. Note: You can also click |
E | Select any of the check boxes below:
Important: Make reviewed quiz visible to Parents and Students must be selected for scores to display. |
F | Select the check box to add the quiz to your Gradebook, and then define the following settings:
Important: If the marking period is locked, the quiz will not be added to your Gradebook.
Note: Assignment categories are set in your Gradebook. |
- Click Save.
- To add a section to the quiz, click Next: Add/Edit Section.
Add Sections to a Quiz
When you click Next: Add/Edit Section, the Add/Edit Section panel opens.

To add a section to the quiz, follow the steps below:
- Type a Description for the section.
- Optional: To present the questions to each student in a different order, select the Randomize Questions check box.
- Click Save. The section appears on the right panel under Description.
Tip: Click
 to edit a section or
  to delete it.
 - Do one of the following:
- To add questions to the section, click Next: Add/Edit Question and see Add Questions to a Section below.
- To add another section to the quiz, click New Section and repeat steps 1-3.
Add Questions to a Section
When you click Next: Add/Edit Question, the Add/Edit Question panel opens.
To add questions to the section, follow the steps below:
- In the Question Type drop-down list, select the type of question you want to add.
Important: True-or-false and/or multiple-choice questions are automatically graded. Essay, short-description, or file-upload questions must be graded manually.
- Type the Question. You can use the text editor to format the text and add links, videos, images, and/or tables. (See Edit Content.)
- Optional: Attach files from your computer, Google Drive™ online storage service, or Microsoft OneDrive™.
Type the number of Points the question is worth.
For multiple-choice and true-or-false questions, see the table below for additional steps.
Multiple-Choice/True-or-False Questions
Multiple Choice
- Optional: To present all possible answers to each student in a different order, select the Randomize Choices check box.
- Under Add another answer, type the first answer.
- Click Add another answer to add the next answer. Repeat this step as needed.
- Next to the correct answer, click Set as correct answer.
Note: For Multiple Choice Multiple Answers questions, you can assign partial credit for correct answers by selecting the Allow partial credit for correct answers check box and typing a value in Score.
True or False
- Optional: To present all possible answers to each student in a different order, select the Randomize Choices check box.
- Next to the correct answer, click Set as correct answer.

Click Save, and the OK.
The question appears in the Show Questions panel.

Tip: Edit or delete questions by clicking Edit or Delete next to the question in the Show Questions panel.
- To add another question to the section, repeat steps 1 through 5.
- When you're finished adding questions, do one of the following:


- To add another section, click Back to Quiz Section.
- To return to the Lesson Planner, click Back to Lesson Planner.
Important: If you selected the Visible to Parents and Students check box on the Add Quiz panel, the quiz appears in the Coursework panel of the student and parent portals. Students can take the quiz by clicking ![]() > Take Quiz in the Actions column.
> Take Quiz in the Actions column.

Copy a Quiz from Another Lesson
You can copy a quiz from another lesson.
To copy the quiz, follow these steps:
- On the Home tab, click the class that contains the lesson you are adding the quiz to.

- On the Section Menu, click the Lesson Plannertab.
Important: You will only see the Lesson Planner tab if your PlusPortals administrator has enabled it.
- On the Unit panel, click the lesson title to expand it.

Scroll down to Activities, and click Add New > Quiz.

- Click Copy Quiz from another lesson, and then click Next.

- Select the quiz and click Copy.

The quiz appears in the Activities panel for the lesson you copied it to.

To edit the quiz, select
 .
.
The Quiz Builder opens with the quiz settings displayed on the left Add Quiz panel.

Edit the quiz settings as needed, and then click Save. (For more information on quiz settings, see Create a Quiz and Add It to a Class.)
To edit quiz content, click Next: Add/Edit Section.
The Add/Edit Section panel opens.On the right panel, click
 for the section you want to edit.
The section appears on the left panel.

See the table below for editing options.
To
Do This
Edit the section description
On the left Add/Edit Section panel, type a new Description for the section and click Save.
Present questions to each student in a different order
- Select the Randomize Questions check box.
- Click Save.
Present questions in the same order for all students
- Clear the Randomize Questions check box.
- Click Save.
Add a question
- Click Next: Add/Edit Question.
- See Add Questions to a Section in Create a Quiz and Add It to a Class.
Edit a question
- Click Next: Add/Edit Question.
- Scroll down to the Show Questions panel.

- For the question you want to edit, click Edit.
- Edit the question, and then click Save. (See Add Questions to a Section in Create a Quiz and Add It to a Class.)
Delete a question
- Click Next: Add/Edit Question.
- Scroll down to the Show Questions panel.
- For the question you want to delete, click Delete.

Edit a Quiz in a Lesson
You can edit quizzes from the Lesson Planner.
- On the Home tab, click the class that contains the quiz.

- On the Section Menu, click the Lesson Planner tab.
- Find the Unit the quiz is assigned to.
- Click the the lesson that contains the quiz.
- Scroll down to the Activities panel and click
 for the quiz you want to edit.

The Quiz Builder opens on the Add Quiz panel, which displays the settings for the selected quiz.

- Optional: On the left Add Quiz panel, edit the quiz settings as needed, and then click Save.
- Optional: To edit or add sections and/or questions, click Next: Add/Edit Section, and then do any of the following:
- To add a section, click New Section.
- To delete a section, click
 next to the section you want to delete, and then click Yes.
 - To edit a section, click
 next to the section you want to edit and see the diagram and table below.

To | Do This |
Edit the section description | On the left Add/Edit Section panel, type a new Description for the section and click Save. |
Present questions to each student in a different order |
To present questions in the same order for all students, clear the Randomize Questions check box. |
Add a question |
|
Edit a question |
|
Delete a question |
|


Preview a Quiz in the Lesson Planner
You can preview quizzes in the Lesson Planner. When previewing a quiz, you can also print the quiz and its answer key.
- On the Home tab, click the class that contains the quiz.

- On the Section Menu, click the Lesson Planner tab.
Important: You only see the Lesson Planner tab if your PlusPortals administrator has enabled it.
- Locate the Unit panel the quiz is assigned to, and click the title of the lesson that contains the quiz.

- Scroll down to the Activities panel and click
 .
.

Delete a Quiz from a Lesson
To delete quizzes from the Lesson Planner, follow the steps below.
Important: To delete a quiz already attempted by students, you must first reset the quiz for each of those students.
- On the Home tab, click the class that contains the quiz.

- On the Section Menu, click the Lesson Planner tab.
- Locate the Unit panel the quiz is assigned to, and click the title of the lesson that contains the quiz.

- Scroll down to the Activities panel and click
 for the quiz.

Important: If the quiz was attempted by at least one student, you will receive the following message: "Cannot delete quiz because the quiz has one or more quiz attempts." To delete the quiz, you must first reset it for each student who attempted it.