The followings topics describe the tasks related to creating and managing class links:
TABLE OF CONTENTS
- Add a Link to a Class
- Copy a Link from Another Class
- Edit Settings for Posted Links
- Delete Links from a Class
- Create a Folder for Links
- Edit or Delete a Link Folder
Add a Link to a Class
You can share links with students by adding them to your Class page and notifying students via email.
Note: To copy a link from another class, see Copy a Link from Another Class.
To add a link to your Class page, follow these steps:
- On the Home tab, click the class you want to add the link to.

- On the Overview tab, scroll down to the Links panel and click Add New.

or
On the Section Menu, click the Resources tab. On the Links panel, click Add > New Class Link.
Important: You will only see the Resources tab if your PlusPortals administrator has enabled it.

The Add Class Link dialog box opens.
- See the diagram and table below for a description of the Add Class Link dialog box.

Add Class Link Dialog Box | |
A | Type a description for the link. |
B | Type a name for the link. |
C | Type the link URL, starting with http://. |
D | Select the folder you want to save the link to by following one of these steps:
Tip: To edit a folder name or delete a folder, see Edit or Delete a Link Folder. |
E | Select the check box for each section you want to add the link to. |
F | Select the check box to send an email notification to students and/or parents. (See Automatically Send E-mail Notifications.) |
- Click Save to save the link to the class, and then click OK.
To view the link in the Links panel, select the appropriate folder in the Links panel drop-down list.
Copy a Link from Another Class
You can copy a link from a class the previous year or from a class in the current year. You can also copy a link from another section of the same class.
Note: To add a new link to a class, see Add a Link to a Class.
Copy a Link from the Previous Year or from a Class in the Current Year
To copy a link from a class in the previous year or another class in the current year, follow these steps:
- On the Home tab, click the class you want to copy the link to.

- On the Overview tab, scroll down to the Links panel and click Add from Library.

or
On the Section Menu, click the Resources tab. On the Links panel, click Add > From Library.
Important: You will only see the Resources tab if your PlusPortals administrator has enabled it.

The Add Class Linkdialog box opens.
- See the diagram and table below for a description of the Add Class Link dialog box.
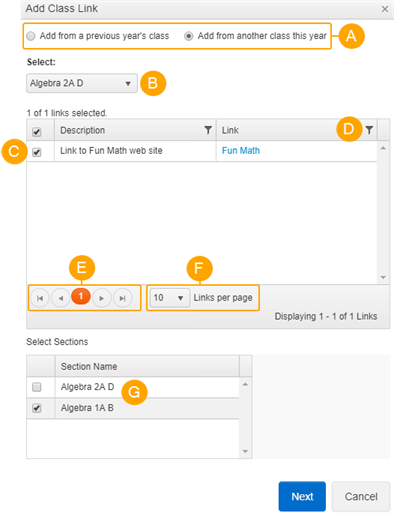
Add Class Link Dialog Box | |
| A | Copy a link from a previous year's class or from another class this year. |
| B | Select the class that contains the link you want to copy. |
| C | View the links associated with the class you selected. Select the check boxes for the links you want to copy. |
| D | Filter items in a column, or change the order of items displayed in a column by clicking the column heading. |
| E | Navigate between pages. |
| F | Customize the number of items displayed on the page. |
| G | Select the check box for the class you want to copy the links to. |
- Click Next, and then Yes to confirm that you want to copy the link.
Copy a Link to Another Section of the Same Class
To copy a link to another section of the same class, follow these steps:
- Scroll down to the Links panel.

- In the Links panel drop-down list, select the folder that contains the link you want to copy.
- Click
 next to the link you want to copy.
The Copy Links dialog box opens.

- Under Copy to the Following Sections, select the check box for the section of the class you want to copy the link to, click Copy, and then click OK.
Edit Settings for Posted Links
You can edit the settings for links posted to a Class page.
- On the Home tab, click the class that contains the link you want to edit.

- On the Overview tab, scroll down to the Links panel.

or
On the Section Menu, click the Resources tab and locate the Links panel.

Important: You will only see the Resources tab if your PlusPortals administrator has enabled it.
- In the Links panel drop-down list, select the folder that contains the link.
- Click
 for the link you want to edit.
 - Edit the settings in the Edit Class Link dialog box as needed, click Save, and then click OK. (See also Add a Link to a Class.)
Delete Links from a Class
You can delete links posted to a class using the following steps:
- On the Home tab, click the class that contains the link you want to delete.

- On the Overview tab, scroll down to the Links panel.

or
On the Section Menu, click the Resources tab, and then locate the Links panel.

You will only see the Resources tab if your PlusPortals administrator has enabled it. - In the Links panel drop-down list, select the folder that contains the link.
- To delete one link, click
 , or to delete multiple links, select their check boxes and click Delete.
 - Click Yes when prompted to confirm the deletion, and then click OK.
Create a Folder for Links
You can create folders to organize the links you add to your class page.
To create a link folder, follow these steps:
- On the Home tab, click the class you want to add the folder to.

- On the Overview tab, scroll down to the Links panel, and click Add New.
or
On the Section Menu, click the Resources tab. On the Links panel, click Add > New Class Link.

Important: You will only see the Resources tab if your PlusPortals administrator has enabled it. The Add Class Link dialog box opens.
- Next to the Select Folder drop-down list, select New.
- Type a name for the folder, and then click Save.
- Click Cancel to close the dialog box.
Edit or Delete a Link Folder
You can edit or delete a link folder using the following steps:
Important: You cannot delete the default Class folder and folders containing links.
- On the Home tab, click the class that contains the link folder you want to edit or delete.

- On the Overview tab, scroll down to the Links panel and click Add New.
or
On the Section Menu, click the Resources tab. On the Links panel, click Add > New Class Link.

Important: You only see the Resources tab if your PlusPortals administrator has enabled it.
- The Add Class Link dialog box opens.
- In the Select Folder drop-down list, select the folder you want to edit or delete.
- Do one of the following:
- Click Edit, make your changes to the folder name, and click Save.
- Click Delete, and click Yes when prompted to confirm the deletion.
- Click Cancel to close the dialog box.