Groups can be used by non-teaching staff members (such as guidance counselors, principals, or athletic coaches) who need to access staff and/or student portal pages. These users can check students’ grades and progress or view teachers' class pages. To create and manage groups, see the topics below:
TABLE OF CONTENTS
- PlusPortal Groups
- Create a Group
- Assign Users to a Group
- Set Group Permissions
- Remove Users from a Group
PlusPortal Groups
Groups can be used by non-teaching staff members (such as guidance counselors, principals, or athletic coaches) who need to access staff and/or student portal pages. These users can check students’ grades and progress or view teachers' class pages.
For users who don't have a teacher or admin account and need to access a group page, do the following:
- For non-teaching staff: Assign the user a staff account in the TeacherPlus Gradebook Sync Manager in AdminPlus, and they can log in to the portal and access the group.
- For administrators: Assign the user an admin account in PlusPortals, and they can access the group from the admin portal.
Teachers can access groups on their portal page. Administrators can access groups by clicking Miscellaneous > View Groups.
Create a Group
You can create a group to give a non-teaching staff member (such as a guidance counselor, principal, or athletic coach) access to staff and/or student portal pages.
Note: An administrator can only manage groups if the main administrator account gives them permission.
To create a group, follow these steps:
- On the navigation bar, click Setup > Groups.
- Click New Group.
- Type a Group Name and Description.
- Under Visibility of Group Page and Calendar, select who you want the group page and calendar to be visible to.

- To add users to a group, see step 3 of Assign Users to a Group. Otherwise, click Save Group to save your group and return to the Create and Manage Groups page.
Assign Users to a Group
This topic covers adding users to a group as either group heads or group members. Group heads have more rights than group members.
Note: An administrator can only manage groups if given permission by the main administrator account.
Add Group Heads to a Group
- On the navigation bar, click Setup > Groups.
- Next to the group you want to add users to, click
 .
. - On the Group Heads tab, click Add.
- In the Select Group Head dialog box, click which type of user (Admin, Student, Staff, or Parent) you want to assign as a group head.
- Select the users you want to make group heads, and then click OK.
Note: At the bottom of the dialog box, click the numbers to view another page of users. Or, in the Users per page drop-down list, click to view 10, 20, 50, or 100 users at a time.
Tip: You can assign multiple types of users as group heads for a group. After clicking OK, repeat steps 3-5, clicking a different type of user this time. You must click OK before switching between types of users to save your selections.
- To set permissions for users, see step 3 of Set Group Permissions. Otherwise, at the bottom of the Edit Group page, click Save Group to save your group and return to the Create and Manage Groups page.
Add Student Group Members to a Group
- On the navigation bar, click Setup > Groups.
- Next to the group you want to add users to, click
 .
. - Click the Group Members tab, or click Next: Add Group Members.
- To add student group members, do any of the following tasks.

Task | Action | |
| A | Add all students in your school. | Under Students, click All Students. |
| B | Add all students from a specific grade level. |
|
| C | Add students from a database search. |
Note: Your search results are automatically added to your group. To see the results of your search, click View Students in Group |
| D | Add individual students. |
Note: At the bottom of the dialog box, click the numbers to view another page of users. Or, in the Users per page drop-down list, click to view 10, 20, 50, or 100 users at a time. |
Tip: At the top of the Group Members tab, you can click View Students in Group ![]() to view the students you have added to your group. In the PlusPortals dialog box, click Yes to save the group details and view the group members.
to view the students you have added to your group. In the PlusPortals dialog box, click Yes to save the group details and view the group members.
- To set permissions for users, see step 3 of Set Group Permissions Otherwise, at the bottom of the Edit Group page, click Save Group to save your group and return to the Create and Manage Groups page.
Add Staff Group Members to a Group
- On the navigation bar, click Setup > Groups.
- Next to the group you want to add users to, click
 .
. - Click the Group Members tab, or click Next: Add Group Members.
- To add staff group members, do any of the tasks described in the table below.

Task | Action | |
| A | Add all staff members in your school. | Under Staff, click All Staff. |
| B | Add staff from a database search. |
Note: Your search results are automatically added to your group. To see the results of your search, click View Staff in Group |
| C | Add individual staff. |
Note: At the bottom of the dialog box, click the numbers to view another page of users; or, in the Users per page drop-down list, select to view 10, 20, 50, or 100 users at a time. |
Tip: At the top of the Group Members tab, you can click View Staff in Group ![]() to view the staff you have added to your group. In the PlusPortals dialog box, click Yes to save the group details and view the group members.
to view the staff you have added to your group. In the PlusPortals dialog box, click Yes to save the group details and view the group members.
- To set permissions for users, see step 3 of Set Group Permissions. Otherwise, at the bottom of the Edit Group page, click Save Group to save your group and return to the Create and Manage Groups page.
Set Group Permissions
You can decide who group heads, group members, and parents of student group members can e-mail. For group heads, you can decide which student and teacher information they can access, give them the ability to add or remove student group members, and control the group's visibility.
Note: An administrator can only manage groups if given permission by the main administrator account. To set group permissions, follow these steps:
- On the navigation bar, click Setup > Groups.
- Next to the group you want to edit, click
 .
. - Click the Permissions tab.
- Select the check boxes for the permissions you want to enable and then click Save Group to save the group .

Remove Users from a Group
This topic covers removing group heads and group members from a group.
Note: An administrator can only manage groups if given permission by the main administrator account.
Remove Group Heads from a Group
- On the navigation bar, click Setup > Groups.
- Next to the group with group heads you want to remove, click
 .
.
- On the Group Heads tab, select the check boxes next to the group heads you want to remove.
Tip: To select all group heads, select the check box in the table header.
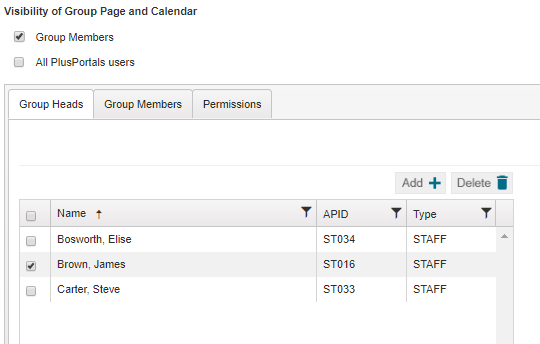
- Click Delete, and then click OK.
- At the bottom of the page, click Save Group to save your group and return to the Create and Manage Groups page.
Remove Student Group Members from a Group
- On the navigation bar, click Setup > Groups.
- Next to the group you want to remove members from, click
 .
. - Click the Group Members tab, or click Next: Add Group Members.
- Under Students, if Students matching the below criteria is selected, remove students by referring to the following diagram and table.
Note: If All Students is selected, to remove students, you must recreate the group by clicking Students matching the below criteria and adding all but the students you don't want. See Assign Users to a Group.

Task | Action | |
| A | Remove all students from a specific grade level. | Under Students from selected grade levels, clear the check box for the grade of students you want to remove from the group. |
| B | Remove a student who was added to the group for meeting demographic criteria. | Under Students matching DB criteria, change the criteria to exclude the student. Tip: To remove all students who were added for meeting demographic criteria, click the drop-down lists on the left, and select the blank option at the top of the list. Note: If a student appears in the group who shouldn't, check their demographic information in AdminPlus. |
| C | Remove a student who was added individually to the group. |
Tip: To select all students, select the check box in the table header.
|
- At the bottom of the page, click Save Group to save your group and return to the Create and Manage Groups page.
Remove Staff Group Members from a Group
- On the navigation bar, click Setup > Groups.
- Next to the group with members you want to remove, click
 .
. - Click the Group Members tab, or click Next: Add Group Members.
- Under Staff, if Staff matching the below criteria is selected, remove staff members by referring to the following diagram and table.
Note: If All Staff is selected, to remove staff members, you must recreate the group by clicking Staff matching the below criteria and adding all but the staff you don't want. See Assign Users to a Group.
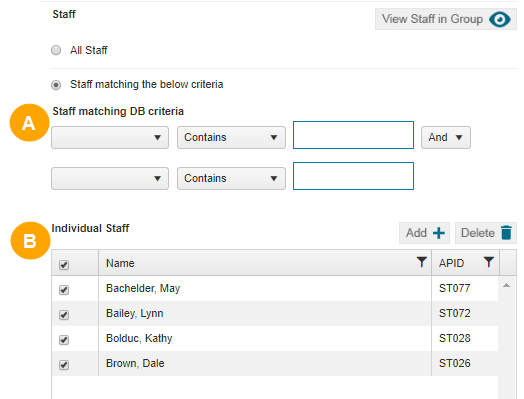
Task | Action | |
| A | Remove a staff member who was added to the group for meeting demographic criteria. | Under Staff matching DB criteria, change the criteria to exclude the staff member. Tip: To remove all staff who were added for meeting demographic criteria, click the drop-down lists on the left, and select the blank option at the top of the list. Note: If a staff member appears in the group who shouldn't, check their demographic information in AdminPlus. |
| B | Remove a staff member who was added individually to the group. |
Tip: To select all staff, select the check box in the table header.
|
- At the bottom of the page, click Save Group to save your group and return to the Create and Manage Groups page.